Rolling Ball Technology
An Online Technical Reference Devoted to
Rolling Ball Sculptures, Clocks, and other Devices
By Members of the rolling-ball@lemur.com List
Notes From a Discussion
with Rolling Ball Sculptor
Jeffrey Zachmann
By
Mark Olejarczyk
|

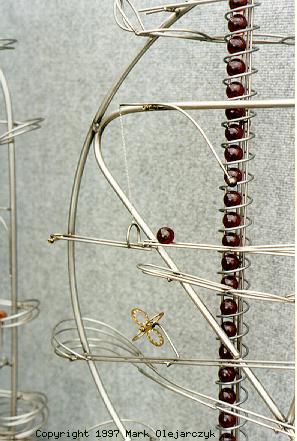
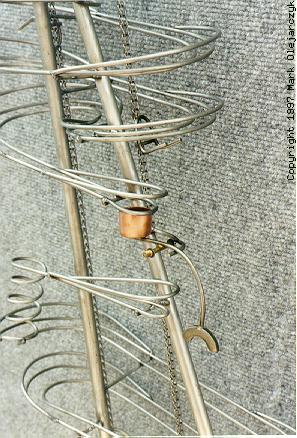
Rolling Ball Sculpture by Jeffrey Zachmann
Photo by and Copyright © 1997 Mark Olejarczyk
|
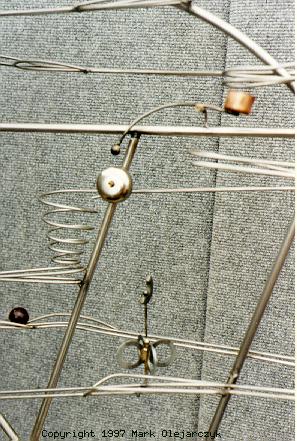
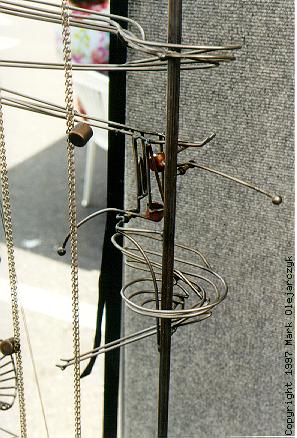
Rolling Ball Sculpture by Jeffrey Zachmann
Photo by and Copyright © 1997 Mark Olejarczyk
|
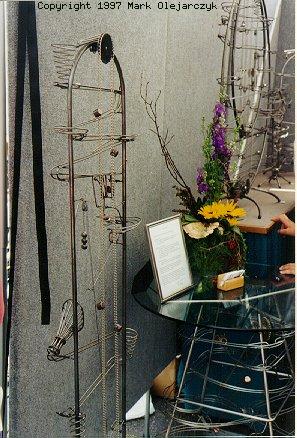
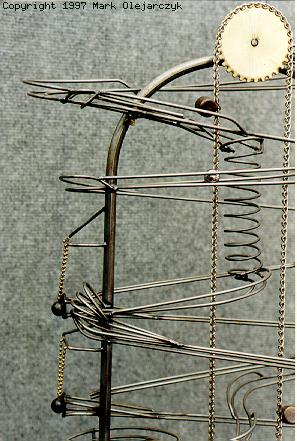
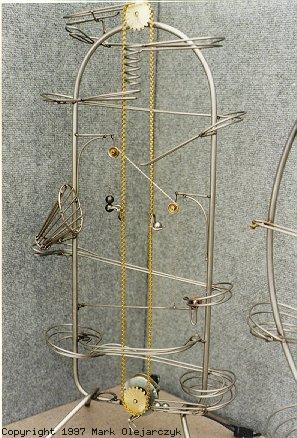
Rolling Ball Sculptures by Jeffrey Zachmann
Photo by and Copyright © 1997 Mark Olejarczyk
|
PREFACE
These are my typed notes and recollections from my conversation with
Rolling Ball Sculptor, Jeffrey Zachmann (JZ). I met Jeffrey at the St.
Louis Art Fair, in Clayton, MO, on September 8, 1997. He hails from
Fergus Falls, Minnesota. Jeffrey was most cordial and cooperative in
answering my questions, and allowing me to photograph his work.
Jeffrey told me that he had never seen any how-to text on this type of
sculpture. Prior to creating his Rolling Ball Sculptures (RBSs), Jeffrey
made pottery. He started making RBSs and it took off for him. The pieces
he displayed were priced from several hundred to several thousand
dollars. I asked him if his work was selling, he remarked "this has been
a very good show."
BASE
JZ displays each of his RBSs on a wood platform. The purpose of the
platform is to give the RBS a level surface to be displayed upon.
Assuming that he constructs the RBSs on a level surface, the RBS needs
to operate on a level surface to function properly.
The platform has a screw type leveling foot, in each corner. The bases
are made from three-quarter inch particleboard, cut slightly larger than
the footprints of the RBS. A one-quarter inch diameter hole is drilled
in each of the four corners, about 1.5' in from each edge. On the board
bottom, each hole is counter bored to accept a "top hat" type nut. The
bases are painted with speckle paint usually a blue / grey color. The
"top hat" type nuts are secured into each corner. A threaded foot is
then screwed into each corner. The base is moved to the intended display
area. A screwdriver is inserted into the hole, in the board top, to
adjust the foot height. The base is leveled in two planes.
IDEA:
I felt that the holes in the base were somewhat unsightly.
Decorative caps / plugs could be used to cover the screwdriver holes.
The thru-holes could be eliminated using a screw leveler that adjusts
with an open-end wrench.
NOTE:
For large RBSs, a means to level the unit should be designed in
from the concept phase. Leveling "feet" or other means could be
incorporated into the frame. Otherwise, the unit will require shimming
each time it is moved to a new display area.
FRAMES / TRACK
Typically, JZ uses 3/8" diameter mild steel rod for the frame of his
RBSs. His ball "tracks" are made out of 1/8" diameter mild steel wire.
He has used stainless steel on a few occasions. JZ told me that he buys
his steel from scrap dealers.
JZ uses a four-step construction technique.
- Weld the frame together
- Attach the ball lift mechanism
- Mount the ball track & gadgets
- Spray the completed assembly with clear acrylic lacquer
JZ's frames are mostly two dimensional, ranging in size from a 36"
diameter table top model, to floor units standing up to 6' tall. He made
several tabletop units developed from 36" diameter rings, with front to
back "feet." He added framing inside the ring to provide additional
track support points. Examples of these tabletop two-dimensional units
include: a circle within a circle (supported by a secant rod), and, a
rounded corner triangle inside the circle.
I saw only two RBSs that had three-dimensional frames. One was the
support structure for a glass topped table. The table was probably 40"
in diameter. The frame consisted of four upright rods, connected at the
top and bottom by four rods. I know that there is a technical name for
this shape, I do not remember my high school geometry very well. It
looks like a pyramid with the top cut off, parallel to the base. (Hey,
go look at your kitchen table legs!)
The other 3-D RBS was actually frame-less. This RBS was built using wire
garden fencing, formed into the shape of an 'S', when looking at it from
a top view. The track was supported by having the various curves and
gadgets welded to the points where they intersected the fence.
JZ is currently using a MIG welding setup for all his work. He told me
that he is experimenting with TIG, as it produces a cleaner weld. The
TIG welds require little, if any, clean up. He noted that a TIG welder
is much more expensive than a MIG.
IDEA:
Start with brazing. This should reduce the initial capital
expenditure and allow one to "tryout" the hobby, before "diving in."
Unfortunately, I think that brazing still requires venting, so you will
not be able to do that in your basement. Back to finding a heater for
the garage!
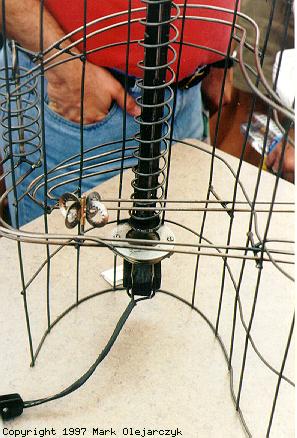
DRIVE MOTOR
JZ uses a gear motor to drive each RBS. Most of the motors have a
perforated metal cage around them, presumably to prevent electric shock.
In the line cord, he uses a thumb wheel on / off switch. JZ told me his
motor source was junk dealers. His wife noted that he buys junk
"whenever he see something he likes." He does not buy for a particular
project. As a result, she said that they "have a whole garage full of
junk."
IDEA:
Would a gear motor that operates on low voltage provide adequate
speed and torque? If it worked, it would provide a reduced risk of
injury. Explore using a battery eliminator / charger for cordless
appliances, calculators, computers, etc.
LIFT SYSTEMS
JZ uses two types of lift mechanisms: a ladder chain drive with gears,
and a rotating coil lift mechanism.
LADDER CHAIN / GEARS - Most of JZ's larger units incorporate this type
of ball lift mechanism. On the units where a lift greater than three
feet is required, he adds a spring-loaded idler gear to eliminate slack
in the chain. The actual lifter is a piece of 1/8" diameter wire formed
in the shape of a clothespin, with the legs bent up. He welds these to
the ladder chain at regular intervals. On one design, he used copper
plumbing end caps, welded to the chain, to lift the ball bearings. He
told me that the angle that the cup / cap was welded to the chain was
CRITICAL.
I noticed that his gears were not injection molded, but were hand made.
JZ told me that he made all of his own gears. They are hand laid out, on
a sheet of thick plastic. Drilling a bolt circle pattern in the piece of
plastic creates the teeth. Sawing out the gear, hole center to hole
center, cuts out the finished gear.
I asked JZ about product safety concerns, as all of his gears are
exposed. He told me that when he decided to start selling RBSs, safety
was his biggest concerns. While he is not an engineer, by training, he
designed a typical spring clutch mechanism. This allows the motor to
keep running while the lift mechanism stops. The clutch consists of a
coil spring, which applies outward pressure from the motor housing to a
plastic disk. This disk is the clutch. It has four 'nubs' on the face of
the disk, spaced at 90 degrees, which align with four recesses in the
drive gear. When the chain is free to run, the plate engages the gear.
The slightest drag on the drive gear causes the clutch plate to
dis-engage from the drive gear. Balancing the two is probably the
challenge.
COIL LIFTER - On his smaller RBSs, JZ uses a rotating wire helix to lift
the balls. This wire spiral looked like a compression spring, up to 3'
in length. They appear to be made from 1/8" diameter wire, wound around
a 1-1.5" diameter mandrel. JZ told me that he does not wind this part
himself. He buys springs, for the consistency of the spiral. The length
of the coil matched the height of the RBS frame. The ball rides inside
the coil. A stationary rod (or small piece of angle iron) is mounted
inside the coil, forcing the ball outward between two coils. The
stationary piece provides a surface for the rotating coil to "lift" the
ball.
Again, JZ told me that he picked up the springs at surplus stores. They
must have some fantastic surplus stores in Fergus Falls, Minnesota!
BALLS
JZ uses steel balls and glass marbles in his RBSs. The glass balls add
color to an otherwise grey machine. He cautioned to watch out for "soft"
marbles, and marbles that are not round. I asked him for his source on
marbles, but he was very coy about answering this question. I did note
that all of his "marbles" are translucent solid colors.
TRACK - FEATURES / GADGETS / MECHANISMS
TRACK - Parallel 1/8" diameter wire. Spacing maintained by a "strap"
welded to the underside.
CURVES - Starts with the parallel wire track, and welds on additional
wires, on the outside track, to create a "banked" track. Multiple wires,
evenly spaced, are added for higher speed turns.
FREE AIR JUMPS - The track just terminates with a slight upward bend,
creating a ramp. The ball is "caught" in a welded "catcher," which
resembles a funnel mounted at roughly 30 degrees.
DEAD-ENDS - A mechanism lowers the ball to next level. The mechanism
uses a counter-weight, attached through a pulley.
- MOVING TRACK - The track pivots to lower the ball.
- TEETER-TAUTER - Ball drains to counter-weighted mechanism, which
pivots to deposit the ball on to the lower track.
LOOPS - Vertical and / or horizontal curved track. The faster the ball
is moving, the larger the loop diameter can be. (E.g., Fast moving balls
can use big loops; slower moving balls need smaller loops.)
WHIRLIGIGS - Mechanisms, in the path of the rolling ball, which when
struck by the ball, rotate horizontally or vertically.
DRAINS - Downward tapered helix track
FINISHING
JZ told me that all of his mild steel RBSs are sprayed with a clear
acrylic, to prevent rusting.
IDEA: Rustoleum has a spray rust preventative primer that dries to a
blue tinted clear finish. This could add some color!
Mark Olejarczyk
10/12/97
With the exception of material noted as being in the public domain,
the text, images, and encoding of this document are copyright ©
1997-1998 by
their author, Mark Olejarczyk and editor, David M. MacMillan.
This document is licensed for private, noncommercial, nonprofit
viewing by individuals on the World Wide Web.
Any other use or copying, including but not limited to
republication in printed or electronic media,
modification or the creation of derivative works,
and any use for profit,
is prohibited.
This writing is distributed in the hope that it will be useful,
but "as-is," without any warranty of any kind, expressed or implied;
without even the implied warranty of
merchantability or fitness for a particular purpose.
In no event will the author(s) or editor(s) of this document
be liable to you or to any other party for damages,
including any general, special, incidental or consequential damages
arising out of your use of or inability to use this
document or the information contained in it,
even if you have been advised of the possibility of such damages.
In no event will the author(s) or editor(s) of this document
be liable to you or to any other party for any injury, death,
disfigurement, or other personal damage arising out of your use of
or inability to use this document or the information
contained in it, even if you have been advised of the
possibility of such injury, death, disfigurement, or other
personal damage.
All trademarks or registered trademarks used in this document
are the properties of their respective owners and
(with the possible exception of any marks owned by the
author(s) or editor(s) of this document)
are used here for purposes of identification only.
A trademark catalog page
lists the marks known to be used on these web pages.
Please e-mail
web@lemur.com
if you believe that the recognition of a trademark has been overlooked.
Version
2.6, 1999/03/20.
Feedback to web@lemur.com
http://www.database.com/~lemur/rbt-zachmann-olejarczyk.html
Go to the: