My late wife Rollande was amazing, in many different ways. Some of these had to do with her approach to jewelry making: if there was something she needed but couldn't buy, she learned to make it. So she learned glass flameworking. She learned mold making and metal casting in bronze, silver and gold. She could make or fix nearly anything with wire-wrap. And when she couldn't find stampings with the right finish, she learned electroplating.
I helped with some of this; it was fun. We set up, some years ago, to do tin and copper plating. For the tin plating we used the kit from Caswell (a supplier well known to the hobby plating community, specializing in plating for automobile rebuilding). For the copper plating, we just did a traditional "roll your own" copper (II) sulfate and sulfuric acid bath. We did this in her workshop in the Cottage (below, left). Then a long series of family obligations arose and we had to set aside electroplating and many other things.
After my interest in type developed, I had intended to use this electroplating setup to "grow" typecasting matrices. This process (which is a specialized version of the process known in industry today as electroforming) is basically just heavy electroplating - thick enough that the plating itself becomes a structurally sound object. For years, I haven't had enough time to do this. But now as things settle down (which seems an odd statement as I write this, in the midst of a planet-wide pandemic) it may be time to give it a try.
Since my new workshop building is intended for "dirty" processes (woodworking, grinding, welding, fabrication, parts cleaning, etc. - as opposed to the meticulously oily cleanliness of the machine shop) it seemed natural to move the electro setup to it (below, right).
The first requirement for any process is a good working space. So here it is - the first of several workbenches intended for electrochemical work (plating, electrolytic derusting) and other "wet" processes (parts cleaning, ultrasonic cleaning, etc.) This bench is only four feet wide, but I expect ultimately to build about 30 feet of similar benches along the same wall. I don't mean to sound vain, but I'm really very pleased with how it turned out.
Here's a more direct view. The old copper plating baths are on the left; I'll probably change their containers. The caustic degreasing bath is on the right. Essential safety equipment for acid and basic (caustic) solutions.
Every workbench needs a light:
This particular bench is devoted just to degreasing and copper plating. I'll be building a similar bench to its left for the tin plating (but as I don't need to do tin plating right now, that may take a bit longer). Other processes will follow. I hope to add nickel plating, but I don't intend ever to do chrome. Chromium is nasty.
The material covering the wall behind the bench is interesting. It is plastic sheeting intended to be used as a waterproof layer behind shower tile walls and in similar circumstances. I find it to be generally quite useful. The manufacturer claims that it is 0.060 thick, but really it measures 0.046 or about 3/64ths (1.15 mm, more or less). It's strong (for what it is) but cuts easily with a utility knife. It's reasonably priced. I've used it for years underneath machine skids to keep moisture from concrete floors from wicking up into wooden skids. Here, I'm just using it as a splash-guard to keep my wall plywood slightly protected.
But I seem to be the only one using it, and I can never remember what it is called when I go to buy another sheet. Trying to describe it to the underpaid "associate" at the home improvement store (so as to find out where they've moved it to this time) is an exercise in futility. To make matters more confusing, it is referred to by its maker by two different trade names at the same time. It is both "POLYWALL Utility Panel" and "PLAS-TEX Waterproof Wall Panel." I'm including some identifying photographs of it here for my own reference. (Years from now, when I've forgotten its name again, I will be able to search on "circuitousroot plastic sheet" and some all-knowing AI will be able to find this note.)
Behind any workbench as synecdoche there must of course be a real workbench. I overbuilt this one, because that's what I do. The wood is AC2 treated and should last many decades (but the plywood sub-top is just regular plywood - I should have used treated plywood). The actual working surface is just a cheap laminate countertop section from everyone in the upper Midwest's least favorite big box home improvement store.
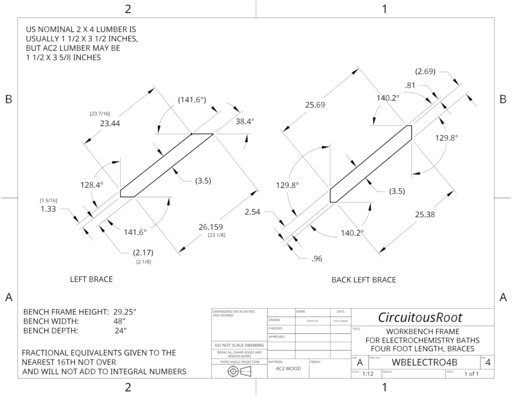
Naturally, I modeled the bench in CAD. It's an easy model to do, and the CAD system can do all of the calculations for the angles on the braces. (But beware of these numbers. They're precise, but this is carpentry rather than machining - and the dimensions of "dimensional" lumber are nothing more than institutionalized lies. In the end, I simply cut several joints to fit.)
The original model is parameterized. This means that I can simply change a number (say, the bench width or height) and get an entirely new model suited for a different purpose (with all of the angles for the diagonal braces automatically recalculated). If you wished to build a similar bench, it would be most useful for me to share this model with you. I'm happy to do so, but there is a problem. I did it in Onshape, which until a few days ago was my favorite CAD program. It really is beautifully implemented. But recently I discovered that Onshape had been purchased by PTC (it happened last year, but I wasn't paying attention). PTC has a history of driving good engineering into the ground through bizarre marketing. So I think I'll be moving away from Onshape - possibly to Alibre (which now owns itself again, after an ill-advised period of takeover). Sadly, there are no truly useful open-source mechanical CAD programs (yes, I've checked, repeatedly, for many years now).
Here's a link to the model in Onshape. It's a public model, but I can't guarantee how long it will be there. If this link doesn't work, search the Onshape public model space for "electrochemistry-bench".
https://cad.onshape.com/documents/70bd3c06e23bcacbd92cbdc6/w/c5026f5845b172c77bafa43f/e/47944ec0bc6c739daf2fdb60
Here are exported versions of the model, in four formats (as local files in my own webspace). These may or may not be useful to you in your CAD program.
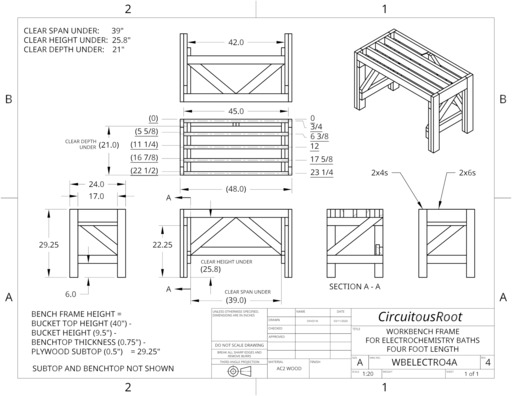
Here, more durably, here are the drawings. Clicking on either of the drawings below will bring up a full-resolution PDF version.
One change I've made since Rollande and I used this setup is in the power supply. The Caswell branded power supply (model NSP-2050) shown below (left) is the one they sell with their plating kits. Generally, Caswell products are very high quality and well suited to their purpose. The exception - very strangely - is their power supply. It's junk. In particular, it is very difficult to do fine adjustments at low current levels. This is really important when you're plating small things. So, instead, I've acquired a BK Precision model 1621A bench power supply. I haven't used in in plating yet, but it is reputed to be a reasonably good middle-grade bench supply. I expect that it will work well. (I have a BK Precision digital multimeter that I really like.)
The next step is to do some trial electroplating on scrap brass, just to get back up to speed on the process. Then it will be on to electroforming a matrix using the Dunker Matrix Electrodeposition Case .
All portions of this document not noted otherwise are Copyright © 2020, 2022 by David M. MacMillan.
Circuitous Root is a Registered Trademark of David M. MacMillan.
This work is licensed under the Creative Commons "Attribution - ShareAlike" license, version 4.0 International. See http://creativecommons.org/licenses/by-sa/4.0/ for its terms.
Presented originally by Circuitous Root®