Having made a paper master pattern and prepared a typemetal working pattern blank, the next step in Goudy's method is to use a pantograph rotary engraving machine to cut a working pattern. This is a straightforward use of an industrial pantograph engraver; Goudy used a Deckel.
A pantograph engraver of the geometric configuration used by Goudy's Deckel produces a workpiece which is an exact copy of its pattern. In cutting, though, the workpiece is generated with a 180 degree rotation to the pattern. Look again at the photograph of Goudy at his Deckel on p. 89 of Bruckner's biography of Goudy (1990) (one of the more useful photographs in the history of matrix engraving). As Goudy is seated at the machine, he hand is on the machine's tracer on his Master Pattern on the upper table; it is a right-reading intaglio pattern that he's positioned upside-down. He is looking down at the Working Pattern that he is cutting. It is a right-reading intaglio pattern, just like the master pattern, but it is right-side-up from his viewpoint. [1] The two-page spread (pp. 90-91) in Bruckner illustrating this machine shows this same information.
This rotation of the working pattern from the master pattern is apparent as he cuts 'Q' in the Kellerman film The Creation of a Printing Type , as well.
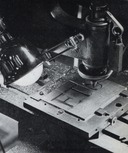
The orientation of the working pattern being cut is discernable in the overall view in Advertising and Selling (May 1939) , but the orientation of the master pattern is lost in the glare:
For making his working patterns, Goudy employed a uniform reduction (regardless of final type size) of 3:1. Thus, his 7 1/2 inch master pattern became a 2 1/2 inch working pattern.
However, the pantographic reduction is only one of two proportions which must be considered in this kind of work. The other is the reduction in scale from the width of the tracer to the width of the cutter. Certain aspects of tracer and cutter choice are straightforward. Thus Goudy (based on his own experience, I'm sure) used three cutters in succession: one of 0.08 inches diameter, one of 0.020 or 0.025 inches, and one intermediate between these. [2] The ratio between the cutter diameter and the tracer diameter must be the same as the pantographic reduction ration - here 1:3. Goudy notes that he must take special care, by measurement and correction, to ensure that the final (smallest) cutter is in fact producing a 3:1 reduction.
One aspect of these pantograph and tracer/cutter reductions may not be obvious (at least to a beginner such as myself). Because this working pattern being cut here in turn will be the pattern for cutting the matrix, the smallest cut space on it must accommodate the largest tracer to be used in matrix engraving. Since the matrix cutter must also be proportionally smaller than its tracer, and since there are lower limits to how small it can be made [3], there is an important relationship between:
However, before actually cutting the working pattern, Goudy used a fine scribe fixed in the cutting spindle to reproduce his lining and set information as fine scribed lines on the working pattern. (While these are shown in Typologia (p. 99), that photograph doesn't really indicate what they are or show their relationship to the edges of the pattern blank. The photograph in his Dolphin article has the same issues.)
The photograph on p. 117 of Boone's article shows much of this information. In it we can see the left and right set/fit information for the 'U', and three of the five horizontal lines (the top of the type, the cap line, and the baseline; the x-height line and the line for the bottom of the type are lost in the glare and the halftone screen).
The photograph in Advertising and Selling (May 1939) of a working pattern being cut also shows some of this information, though not as clearly [4]:
It sounds like a trivial step, but marking the working pattern so as to identify it is quite important if you ever plan to make more than one.
The example in his Dolphin article (see below) indicates that he simply scribed, by hand and rather crudely, his type series number and the date. It's a little hard to make out, but the photograph in Advertising and Selling (1939, see above) would seem to show at least a hand-scribed date.
A completed working pattern, with scribed lining/fitting and identifying information, appears at 6:28 in the Kellerman film.
The working pattern (captioned "metal pattern") for Goudy Medieval in "On Designing a Type-Face" ( The Dolphin, No. 1, 1933) , Fig. 18 on p. 14 illustrates a slightly earlier stage of (or perhaps just a variation of) Goudy's practices.
It has only one of the five horizontal lines scribed on it. This seems surprising, given the care with which Goudy transferred all five lines in other sources. However, this top line indicates the top of the type body and corresponds to the "head bearing" of the matrix. For vertical alignment, this is all you need.
The illustrations in his Dolphin areticle include not only these working patterns but also design drawings, finished drawings, and master patterns.
A Goudy working pattern is right-reading and intaglio. It has a nominal height of 2 1/2 inches (between the lines indicating the top and bottom of the type body) and indicates lining and fitting information. It usually carries additional lining information not strictly required for matrix cutting.
1. We are fortunate that he was engraving a pattern with an 'R', a letter which identifies clearly both rotational and right/wrong-reading transformations.
2. These are the sizes he mentions in Typologia. (1940) , p. 97. In his earlier article in The Dolphin (1933) , he says he uses a range of tracers from 0.020 to 0.050. It would seem that his tracers became finer as his experience increased.
3. Goudy cites a matrix cutter diameter of 0.002,31 - very tiny, but not as tiny as Benton used.
4. In general, people who do not make type seem to have little conception of lining and fitting, but it is the single most time-consuming aspect of both matrix making and typefounding. Fournier may well have meant it when he said that a matrix well struck is half justified, but that doesn't mean that the other half is going to be easy!
The 1939 volume of Advertising and Selling is in the public domain. The images from it reprinted here remain in the public domain.
All portions of this document not noted otherwise are Copyright © 2013 by David M. MacMillan and Rollande Krandall.
Circuitous Root is a Registered Trademark of David M. MacMillan and Rollande Krandall.
This work is licensed under the Creative Commons "Attribution - ShareAlike" license. See http://creativecommons.org/licenses/by-sa/3.0/ for its terms.
Presented originally by Circuitous Root®
Select Resolution: 0 [other resolutions temporarily disabled due to lack of disk space]